Editing activities
These are great exercises to get you in the swing of editing with the software of choice; they will also give you a better understanding of rhythm.
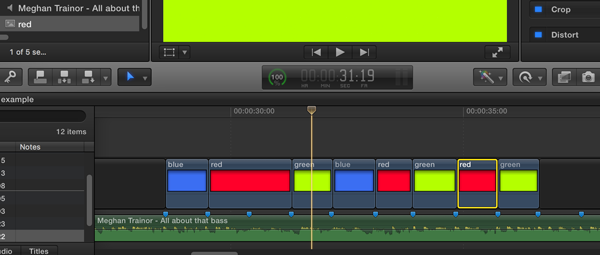
Editing with colour
In a graphics program create three colours, perhaps green, blue and red. Export them as jpeg’s, then import them into your editing program. Select a piece of music and import that too.
Now edit to the music with the three colours using cuts only. It’s as simple as that. You’ll start to understand the differences of cutting to the beat and finding the ‘off beat’. It’s quite often these ‘off beats’ that are harder to find and are the ones that disguise a cut and make it invisible. It becomes apparent that cuts on the beat have more impact visually, not always the desired effect.
Now allow yourself transitions between colours. Mix two together, fade in and out, have a bit of fun. Assess the difference between simple cuts and transitions. Which is quicker, which is more effective? You’ll find that you spend much more time on transitions, which is the reason for keeping your first assemblies simple whilst you sort your structure out.
Editing a soundscape
Source an array of different sound effects. You can either record these yourself or access an on line sound library.
Using sound only, build a soundscape on your timeline. Try changing volumes to make it more natural. Add some audio effects if your software allows it. Try to tell a story with the sounds. How well do the sounds create an image in your mind? Play around with different versions.
Editing dialogue
Working from a script, get two ‘actors’ to act out a scene which contains a two way conversation and film this in two close up or medium shots.
Remember - if you’re recording dialogue on set, you need to decide whether you will allow your actors to talk over each other or not. If they do talk over each others lines then you have to stick with that timing in the edit. Lines can recorded with a slight pause in between lines and the overlapping is created in the edit, giving much more flexibility.
Import the footage. We’re now going to cover one way of how to find the rhythm in dialogue.
Mark the in and out where each actor starts and finishes a line and place in the timeline in script order. Once you have your ‘first assembly’ it’s time to review the edit. Try not to look at the picture, you could even switch the video channel off if your software allows.
Now, listen to the rhythm and pace of the dialogue. Do you need to tighten certain cuts closer to one another? Do some need more pause, a longer reaction from the listener? Would it be more realistic to actually have the listener interrupt the speaker so that they don’t even finish their line? If you have clean dialogue you can create a very different pace then how it was performed on set. And this can be very useful.
Think of the roller-coaster again. Don’t have one pace, even for a conversation. Peaks and troughs, fast and slow, anticipation and surprise. Play around with different rhythms until you’re happy with the pace.
Now it’s time to look at the picture. So far you will have been cutting sound and picture in the same place, so the image will look very ‘blocky’. One person talks, change shot, other person talks, change shot. What you really want to have is overlaps in the right place. You will often want to be on the listener rather than the speaker, because a lot of the time it’s the reactions to what is being said that is more important. And you still hear the dialogue, so you get two for one. Learn how to use the trim tool, or if your software doesn’t have it, just make marks and extend the cut to where it feels it should be. It’s a tricky, exercise but an invaluable one that will get easier with experience.